
Hi everyone! Today I wanted to share with you how to paint a parking spot. My high school let seniors paint their parking spot this year which I was super excited about. I tried researching tips and tricks on how to do it and found nothing so I'm writing this to help anyone out there who is painting their parking spot. As a Disney Lover, I knew my spot had to have a nod to my love of Disney. I really wanted to paint the sun from Tangled because it's my favorite movie. However I was skeptical that I had the skills to make it accurate looking. One of my favorite quotes from Tangled is "Best Day Ever" so I thought it would be fun to paint "Best Year Ever" because senior year is hopefully going to be the best ever. Through many trials and errors I got to the final product and could not be happier about how it turned out. Contrary to popular belief, painting a parking spot takes a lot of time and effort. I thought it would take 2-3 hours tops but I ended up doing it for 5 hours (if you have a less complicated design or aren't painting the background it will take less time).
Disclaimer: Do not paint a parking spot without permission from school. I am not suggesting to paint a parking spot in public places or without city permission.
Materials:
Paint: Whatever paint that your school requires you to use. My school for example said that I had to use water based latex exterior paint. I used 1 gallon of the purple background paint and bought pints for the detail colors (yellow and white). I could have used more of the purple as the bottom part of my parking spot is patchy. So if you want a completely solid background, I would get more than 1 gallon. Don't forget the paint tray and paint can opener.
Chalk: I used chalk to draw out my sun and trace the writing which is great since it will wash off. You might be able to see some of the chalk lines in the writing because it hadn't rained before I took these pics. You could also create stencils but I just printed out a picture of my design and freehanded it.
Paint Brushes and Rollers: Make sure you get a lot of paint brushes and rollers and to have at least one for each color that will be used. I used a paint roller for the background and the paint brushes for all the details.
Painters Tape: Use the painters tape to outline the spot so you don't paint over the lines or on your neighbors spot. You could also use painters tape to outline your design but keep in mind that it doesn't stick on that well to the ground.
Hula hoop (optional): A hula hoop is a great tool to use if you are having any sort of larger circle incorporated into your design. I totally forgot about this but was able to borrow a friends hula hoop. I just traced around the inside and outside of the hula hoop the create the inner part of the sun.
Broom or Leaf Blower: It's important to clean off your spot before you even start painting it. I used a broom to get all the leaves, dirt, and pine straw off my spot but if you want it to really clean, I would recommend a leaf blower to get everything out of the cracks.
Cloths or paper towels: Painting is messy so make sure you have something to wipe your hands on like a old cloth or paper towels.
Towel: It's not too comfy sitting on the ground for long periods of time so bring a towel to sit on. For me I was painting in the heat of the day so the ground was burning hot and the towel was nice to have.
Paint Roller Extension Pole: This is super important to expedite the process of painting the background color and super helpful so you don't have to bend down or sit to paint the majority of the spot.
Steps:
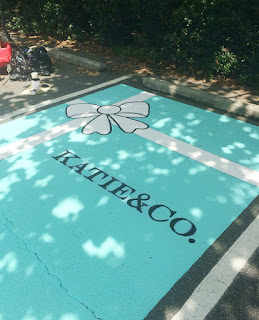
1. Choose a design and draw it out to make sure that you can do it. There aren't many ideas on the internet but there are a few on Pinterest. I also am including some of my favorite spots from my school below as inspiration for y'all.
2. Buy your supplies. Make sure you find the paint that your school requires. If you are painting the entire spot I would recommend at least 1 gallon paint can for a background color. For details I would suggest getting pint sized or sample sized paint cans. Make sure you get ample paint brushes and paint rollers along with the paint roller extension.
3. Clean off your parking spot. Use a broom or leaf blower to clean off your spot and get all the dirt, leaves, and whatever else is on your spot.
4. Paint your parking spot. If you are using painters tape, outline your spot before you start painting. First paint your base coat using a paint roller. The more paint you have the more solid the background will be. The paint should not take too long to dry and for me it was around 30-40 mins. Then paint on whatever designs that you want. I would suggest to draw them out in chalk before actually painting them. Let it dry and viola you've got a beautiful painted parking spot. Make sure you don't let any cars park on your spot. I used a cone which worked perfectly.
I would love to see any painted parking spot you create! Email them to me at info@gracieinprep.com or tag me on Instagram @gracieinprep :)
Thanks so much for reading!


